Showing posts with label diy. Show all posts

Thursday, April 15, 2010

Got some new things for the Dollhouse I'm making

Firstly, I have assembled a nice bedroom cabinet:

Above: The inside
Above. My general problem when I made this was that the doors wouldn't close the way it should. I think I made the spaces too tight on this one.

Above: Right side up.
Above: Wrong side up hehe.

I realized that maybe I should get a varnish and cover the necessary wooden furnitures with it to add gloss and to protect themselves from dust. Hmm, should I use brush with it? Or spray it...? *mumble mumble*


Sunday, February 7, 2010

My Doll House: Kitchen and part of Bathroom Part 2

Okay, I wasn't able to find the other pictures, so there'll be some assembly pics that are missing.

Part 1

3. Painting

So after you have assembled all the pieces according to the instruction manual, you are now ready to paint them. Just to be safe, I used the colors as shown in the manual (it's hard to find if you don't have a background in Japanese) Colors used were Burnt Sienna, Burnt Umber, Blue, Gold (acrylic) and White. I used mostly poster colors (because around that time, I don't have money to buy the acrylic ones, and my acrylic set were missing). After a while, the white color got absorbed by the wood, and was forced to borrow a tube from a friend.

a. Cabinet


Above. Hehehe yep~ That's my workstation haha~

You paint the main ones first, like its overall color. In the case of the cabinet, I painted the inside first because painting it last is harder when the outside is already done.

After you paint the main color, you can put in the details (optional)


4. Adding details

Once the paint is dry, you can now add hinges to the cabinets and the door.


5. Setting up wallpaper

According to the instructions, there are panels that needed to be painting (outside and floors), and the inside to be covered in wallpaper (included in the set).

Tip, don't cover the wood with white glue unless you are, unlike me, able to smoothen out the wallpaper without producing any lumps. Hehehe~


Above. Painting the outside with White Poster Paint (I used at least two-three coats)


Above. Wallpaper drying.

6. Setting up the walls and other assembling

Once all the pieces are done, you can now put the wooden frames (make sure to check that you're using the correct sides), and the door. Use a Philips screwdriver (I'm using the Leatherman one) to attach the screws together.


Aaaannnddd you're done!


You can now arrange your furniture in whatever manner you want it to look like.


Above. Note, not all were painted at this point *looks at the bowl of fruits*


Above. Utensils and other really cute kitchen stuff


And that's the kitchen, the first room on the first floor. I hope I finish the whole dollhouse by the end of this year *dances the work dance*

Monday, January 25, 2010

My Doll House: Kitchen and part of Bathroom Part 1

The box consists for a wall or a floor, then a furniture. Or a furniture, then the small parts and pieces (e.g. kitchen utensils). It comes with instructions, which you can compile and place it in a binder. It also comes with a parts' page, like an inventory of the things you get in the box. It also has this mini magazine of some of the things you may do with the parts and/or layout you can come up with.

1. Sample box and parts


2. Assembly

a. Door


b. Folding table


Here are the completed kitchen utensils. Hmmm...I should've made a size comparison...


c. Bathtub

Most of the parts that was done were kitchen things, so having this bathtub is a bit odd. Nevertheless, it's going here on this post as well.


Note. The bathtub is done by my brother.

Okay, I'll stop here. I need to find the assembly pictures of the rocking chair and the cabinet hehehe~

It won't be long now~

Sunday, January 17, 2010

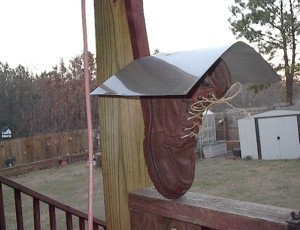
Old shoe, new birdhouse

So I found this lurking in the interwebs, and it needed to be posted.

An easy to make and easy to clean out birdhouse. Just undo the laces to clean it out. The boot was thrown in the trash and I rescued it. Screwed the board to the sole, added the roof made of flashing and a raffia shoelace. I love it and so did a Carolina Chickadee family this year.

- Source


I especially liked the part wherein you can untie the shoelaces to clean the birdhouse.

~~~~~~~~~~~~

If you've noticed, I'm not posting as much as I should've. Well, to tell you guys some news, I'm working on some DIY projects. I just don't have the right equipment to transfer the pictures. Those are being taken care of (a.k.a as soon as sister and her laptop comes home haha), I'll post them here.

I'm excited with the projects, and I hope you will too.

Thank you for bearing with me~

Thursday, December 10, 2009

Bought meself some air dry clay

I wanted to try doing some little sculpture awhile back, but was a bit disappointed at the cost of polymer clay (P700, Deovir). A friend of mine suggested I use Air Dry Clay instead. You don't need to bake it, just let it dry under the sun or overnight. So I bought 1 kilo (P38, Deovir), and tonight I pulled a chunkful to make trial little sculptures.

So while they're drying (a lamp is hung overhead, turned on), I'm making this post. Here are some things I noticed while using this type of clay:

1. It's gray. Ugly gray. The saleslady said I can paint acrylic over it, so clay color doesn't matter.

2. You need to put water on the clay to make it malleable. I was adviced to mash it first before using (I think this is an SOP on clay substances. I'm not sure though).

3. Putting too much water will make it a slippery gunk of mud.

4. Mold it in any way you want when the clay is just moist.

5. When your done, you can coat it with water to make the outside smoother.

So far I have made what I call a "Cat Set:"

1. Cartoony cat. At least one inch in height.

2. Two bowls, one for food and one for milk/water.

3. Fish

4. Cat food (I don't know what it looks like, and I don't really care, so I got an unused pen, and stabbed the surface with it to make it...chunky)

5. Toy mouse

6. A ball of yarn.

It is also important, and I reiterate IMPORTANT to put plastic over your workspace. Although they can clean off easily, the clay is still pretty messy.

I'll post pictures when I'm done (or I can find the opportunity to transfer picture files from my cellphone).

Monday, December 7, 2009

DIY Rock 'N Roll Bracelet

A small project I cooked up the other day. This one is how to make a rock n roll bracelet.

Materials


1. One inch thick black garter (this one I found in Marikina. Costs me at least P13 for a yard)
2. Black thread
2. Needle
3. Two buttons (you can put as many buttons as you like, with any design that you want. You can also put in safety pins with beads)
4. Scissors


Procedure

1. Cut the garter using a pair of scissors according to the size of your wrist. Make some leeway for sewing.


2. Make small folds on each end, press them against each other, then sew them together. This is to prevent the ends from fraying.


3. Sew the buttons near the sew line. This is to avert the attention on the line by hiding it using the buttons. You can also put any other buttons you want, and other decorations you like to put as well.


Just to show the buttons in relation to the sew line:


4. And your done! Enjoy!

RF Bellato Guild Master Female headgear props


Above. Gray accompanying me while I work. Not what I expected though.

This post is about a headgear I made as part of the costume of the Female Bellato Guild Master. They were photographed a bit too late--they're still in separate pieces though, and is just about to be assembled.

There were three main parts of the headgear, and was constructed out of left over rubberfoam, and some parts using a used illustration board (talk about recycling). I did this overnight because I didn't have enough time to make this on that week. It was a busy week in the office.

1. The main base which was composed of an octagonal box constructed from a thin ply of rubberfoam, and a thick one (at least half inch) as foundation. Then the rest of the small octagonal parts were glued on top, then painted using silver acrylic as the main color. I used at least two coats of paint. It didn't have to be too silvery because the effect I was going for was metallic silver. Black acrylic was used to paint the outline detail.


The one hanging off from the table was made out of cut illustration board, then glued on rubber foam so it'll flap like that.

The Indian feathers-looking things protruding from the back were also made from illustration board. Both painted using silver acrylic.

2. This one is made out of rubberfoam, and the trickiest to assemble. It should be made from one single rubberfoam, which turned out okay on this one. The extension is made from a pattern done beforehand, then glued together.


Note: Since I didn't have time to make corrections, the final product ended up with hexagonal sides instead of octagonal.

3. My favorite piece of all. It was said that when you need to brainstorm, you need to be pressured. Or something like that.

My main problem on this one is making the dome shape in the center. What I did was I cut one of the dishes (from a set of six, small size). It doesn't need to be perfect because you'll be covering it with a rubber foam outline. Paint the outside with red acrylic paint. When it's dry, paint it with glue solution (50% glue, 50% water) carefully to protect the paint and to make it quite glossy.

And then glue it under the rubber foam outline, and now you have a quick orb thingy.


Since it's hard plastic, I used my dad's utility Leatherman and sawed the paint dish off. You have to be careful not to cut yourself.

Once you have assembled the three main parts, you attach a strip of garter under the main base and the flap-thingy on the side (measure beforehand on the model).

And this is the finished product, worn by the model, Chepot:


On another related note, see the necklace Chepot's wearing? That's made out of felt cloth, then painted the details on.

I'm not particularly proud of that. Especially if I have to sew the whole thing in place on the model. After she cosplayed, she had to cut the ends off to free her from the necklace.

In any case, here are some pics:

1. Cut out a strip of yellow felt cloth. Painted the details on using gold and red acrylic (gold to make it more...shinier and sparkly).


2. Rubber foam painted gold (two to three coats). Then painted the details after the base paint has dried.