Thursday, April 15, 2010

Got some new things for the Dollhouse I'm making

Firstly, I have assembled a nice bedroom cabinet:

Above: The inside
Above. My general problem when I made this was that the doors wouldn't close the way it should. I think I made the spaces too tight on this one.

Above: Right side up.
Above: Wrong side up hehe.

I realized that maybe I should get a varnish and cover the necessary wooden furnitures with it to add gloss and to protect themselves from dust. Hmm, should I use brush with it? Or spray it...? *mumble mumble*


Sunday, April 11, 2010

Guess who's back~!

Sorry for the hiatus. It's like the Holidays never left me for weeks hehe (and had some technical problems, but that's over now).

I'm thinking of switching to Wordpress for my blog because of Divine Project but the hassle of moving all the pictures, posts, and everything in between seems daunting, so I'll stick with blogspot. Besides, I think they made an update on more themes, so it's all good. I hope they update more regularly (do you think they'll offer more customizable theme options? *hint hint*)

So here's what happened for the past weeks (or months hehe):

1. Kept downloading more home pictures, which hopefully I can upload the ones that are post-worthy--at least on my standards. Not that I'm being an elitist or something, and there are plenty of good designs out there, but that's just it. Too many good designs to post. So Imma limit by putting up "standards." Uh, nuff said.

2. Went around churches in Rizal and Laguna area for Visita Iglesia with my boyfriend and his family. Did not mention to them (except for my boyfriend) that it was my first Visita Iglesia. Took pictures of the wonderful old Churches, which hopefully I can upload as soon as possible.

3. Finally got the funds to go back to Japanimation and bought more Doll house stuff. Though this time the choices are limited, and hoping to get the first floor done. For this trip, I got the stairs, and some lighting (with battery pack) for the kitchen.

There~! Hopefully I can have more updates written soon~ Happy Summer!

Wednesday, February 10, 2010

Win 5000 worth of Fully Booked GCs

Not sure if this is true, but it looked fun so click here to answer a short survey so you'll have a chance at winning 'em.

Good luck!

Sunday, February 7, 2010

My Doll House: Kitchen and part of Bathroom Part 2

Okay, I wasn't able to find the other pictures, so there'll be some assembly pics that are missing.

Part 1

3. Painting

So after you have assembled all the pieces according to the instruction manual, you are now ready to paint them. Just to be safe, I used the colors as shown in the manual (it's hard to find if you don't have a background in Japanese) Colors used were Burnt Sienna, Burnt Umber, Blue, Gold (acrylic) and White. I used mostly poster colors (because around that time, I don't have money to buy the acrylic ones, and my acrylic set were missing). After a while, the white color got absorbed by the wood, and was forced to borrow a tube from a friend.

a. Cabinet


Above. Hehehe yep~ That's my workstation haha~

You paint the main ones first, like its overall color. In the case of the cabinet, I painted the inside first because painting it last is harder when the outside is already done.

After you paint the main color, you can put in the details (optional)


4. Adding details

Once the paint is dry, you can now add hinges to the cabinets and the door.


5. Setting up wallpaper

According to the instructions, there are panels that needed to be painting (outside and floors), and the inside to be covered in wallpaper (included in the set).

Tip, don't cover the wood with white glue unless you are, unlike me, able to smoothen out the wallpaper without producing any lumps. Hehehe~


Above. Painting the outside with White Poster Paint (I used at least two-three coats)


Above. Wallpaper drying.

6. Setting up the walls and other assembling

Once all the pieces are done, you can now put the wooden frames (make sure to check that you're using the correct sides), and the door. Use a Philips screwdriver (I'm using the Leatherman one) to attach the screws together.


Aaaannnddd you're done!


You can now arrange your furniture in whatever manner you want it to look like.


Above. Note, not all were painted at this point *looks at the bowl of fruits*


Above. Utensils and other really cute kitchen stuff


And that's the kitchen, the first room on the first floor. I hope I finish the whole dollhouse by the end of this year *dances the work dance*

Monday, January 25, 2010

My Doll House: Kitchen and part of Bathroom Part 1

The box consists for a wall or a floor, then a furniture. Or a furniture, then the small parts and pieces (e.g. kitchen utensils). It comes with instructions, which you can compile and place it in a binder. It also comes with a parts' page, like an inventory of the things you get in the box. It also has this mini magazine of some of the things you may do with the parts and/or layout you can come up with.

1. Sample box and parts


2. Assembly

a. Door


b. Folding table


Here are the completed kitchen utensils. Hmmm...I should've made a size comparison...


c. Bathtub

Most of the parts that was done were kitchen things, so having this bathtub is a bit odd. Nevertheless, it's going here on this post as well.


Note. The bathtub is done by my brother.

Okay, I'll stop here. I need to find the assembly pictures of the rocking chair and the cabinet hehehe~

It won't be long now~

Sunday, January 17, 2010

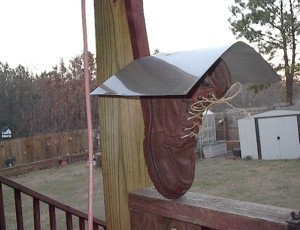
Old shoe, new birdhouse

So I found this lurking in the interwebs, and it needed to be posted.

An easy to make and easy to clean out birdhouse. Just undo the laces to clean it out. The boot was thrown in the trash and I rescued it. Screwed the board to the sole, added the roof made of flashing and a raffia shoelace. I love it and so did a Carolina Chickadee family this year.

- Source


I especially liked the part wherein you can untie the shoelaces to clean the birdhouse.

~~~~~~~~~~~~

If you've noticed, I'm not posting as much as I should've. Well, to tell you guys some news, I'm working on some DIY projects. I just don't have the right equipment to transfer the pictures. Those are being taken care of (a.k.a as soon as sister and her laptop comes home haha), I'll post them here.

I'm excited with the projects, and I hope you will too.

Thank you for bearing with me~

Tuesday, January 5, 2010

Dvorak Simplified Keyboard

The one we're using is the standard Qwerty Keyboard invented by C. Latham Sholes in the 1860s. In 1936, August Dvorak invented this kind of keyboard layout according to how we use the letters and how we type them. He is, after all, a psychologist (educational).


Here are some facts about the keyboard:

1. Letters should be typed by alternating between hands.
2. For maximum speed and efficiency, the most common letters and digraphs should be the easiest to type. This means that they should be on the home row, which is where the fingers rest, and under the strongest fingers.
3. The least common letters should be on the bottom row, which is the hardest row to reach.
4. The right hand should do more of the typing, because most people are right-handed.
5. Digraphs should not be typed with adjacent fingers.
6. Stroking should generally move from the edges of the board to the middle. An observation of this principle is that, for many people, when tapping fingers on a table, it is easier going from little finger to index than vice versa. This motion on a keyboard is called inboard stroke flow.

Though they weren't successful as the mainstream keyboard, it had found its way to newer platforms and ergonomic keyboards.

Source

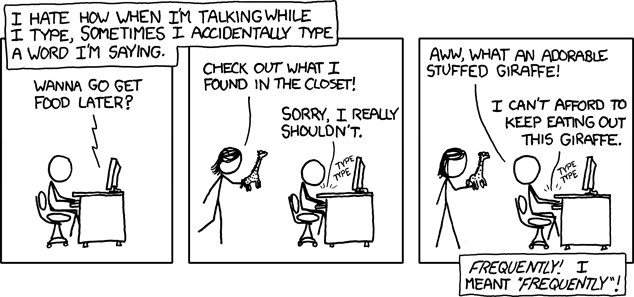
I just find this fascinating. And then this comic shows up:


Maybe it IS interesting to learn a new keyboard.

Monday, January 4, 2010

MAKI STOOL!!


noji-berlin released a new set of seating and lightning designs, and one of them is the Maki Stool.

The idea for the MAKI collection came to us while eating sushi. The stools are abstract versions of maki rolls inspired by the original. One wants to sit down on the funny little chairs made of wood and felt and enjoy the sensation of being like a child. nojiberlin loves the carefree nature of youth.


I'd love to have one of these in my room~

Source.

Sunday, January 3, 2010

I'm thinking of doing something like this:


Okay, minus the nice pumpkin looking thing on top. I'm thinking of buying choco cupcakes, then melting a batch of marshmallows.

We still have some leftover marshmallows from New Year's. It's a nice way to eat them 8D

Thursday, December 24, 2009

^__^

Dropped in to greet all of you a Merry Christmas~!

*goes back to her vacation*